One of the top-notch networking devices in the industry these days is Netgear Nighthawk XR1000 router. It is not a regular router; instead, it is a device. This device is known to have good WiFi 6 speeds and a few nifty tools to help the user enhance the latency when playing games online. Taking the Netgear Nighthawk XR1000 review into consideration, many people have started opting for this networking device.
They have purchased it, yes, but are unable to configure it. In case you are one of them, then the information given on this page will be helpful. Continue reading.
The first step of setup is to unpack the Netgear Nighthawk XR1000 pro gaming router. You will find out that the package contains the not just the router, but also other components. Some examples conclude a power adapter, an Ethernet cable, and an installation guide.
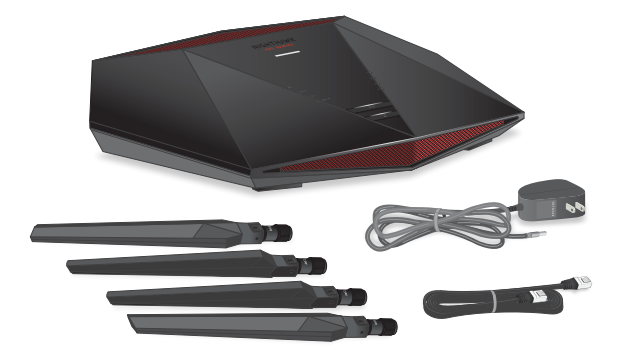
The Netgear XR1000 router would have also come with four antennas as you can see in the figure given above. Align the antennas with the antennas posts. Make sure that you observe the marking on the antennas as well as the posts. Connect each attach to its respective post. It is advised that you place them in a vertical position. This is for best WiFi performance.
Locate the router near the center of the area where the computer and the existing modem is kept. Also, ensure that the XR1000 router is within the reach of an AC power socket. At last, place the device in an elevated location. This means that the number of walls and ceilings between the router and other devices will be minimized.
The next step in line is to connect the router to the modem. You can do this by unplugging the modem, removing it, and reinserting the backup battery, and the modem back in. Use an Ethernet cable to connect the modem to the router. To learn how to do the same in detail, it is recommended that you refer to the following image.
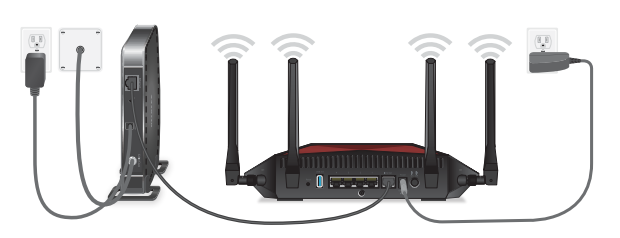
Connect the XR1000 into a wall socket and press the power button. Now, you need to wait for the LED light on your networking device to turn solid white. This will indicate that the router is ready to use now.
Gain access to a damage-free Ethernet cable. Connect one end of the cable to the port of the computer. Plug the other end into the XR1000 router. Your computer will soon connect to the local area network, i.e. LAN.
Switch on your computer and go to WiFi network management settings. Find the network name of your Netgear XR1000 router. Enter the password given on the router label. In a few seconds, the device will connect to the WiFi network of the router.
On your system, open an internet browser and enter routerlogin.net. Press the Enter key to make your way to the CONFIGURING THE INTERNET CONNECTION page. Now, follow the on-screen prompts to complete performing Netgear Nighthawk XR1000 manual setup.
Although you will face no issues while executing the Netgear Nighthawk XR1000 manual setup process, by any chance, if you do, then use the Netgear Nighthawk app to execute the same process. We are hoping that it works for you.
Now that you have successfully set up your networking device, you should learn how to update its firmware. Performing Netgear XR1000 firmware update will help you to keep technical issues at bay. You may read the following section to get a knowhow of how to update the firmware of your router.
In this blink of an eye, you will be able to successfully update the Netgear XR1000 firmware with ease. Now, you are free to enjoy an enhanced performance of your networking device.
Disclaimer: We hereby disclaim ownership of any product and any association, affiliation or representation in any form, of any brand, product or service. All the information provided here has been drafted by a team of highly qualified technical experts and regularly undergo reviews and updates.